Preface
Online meeting text about the concert photos, I am struck by the number of “water” and a minimum of practical advice in these articles. And these “tips” are reduced to the obvious things:
* “In concert, there is bad light”
* “Catch the moment – objects are moving”
* “Look for interesting angles”
All this and so it is understandable. All this follows logically from the concept – “live picture.”
That’s why I decided to write this article. I want to tell you about the practice of recording concerts and how to really become a concert photographer, namely:
* How to get accredited photographer.
* How to remove musical performances.
* How to Handle concert photos.
How to get accredited photographer.
If you want to do some really interesting photos of musicians – accreditation as a photographer at the concert needed. In small clubs, and you may be able to get close to the stage, but on large sites without accreditation do not succeed. Yes, and a serious photographic equipment for the concert, as a rule, no accreditation will be carried by.
In fact, to get official accreditation to the concert is not difficult. There are many ways to do this, I will tell you about the most simple and accessible to anyone who has a desire to withdraw.
On the Internet there are a lot of “music news agencies,” or more simply just sites that publish reviews of albums, reports from the concerts and so forth okolomuzykalnuyu information. And very few of them – it is really the edition in the fullest sense of the word, ie paying decent fees journalists and photographers who have a permanent staff, etc. Typically, these publications – the famous “brands” in the media market and the website for them only an appendage to the paper version of the magazine.
Most online music publications work on the “enthusiasts”. Photographers and journalists working there either gratuitously or for a very meager royalties. But that’s why these sites are interesting to us and, in fact begin to cooperate with the publication of any person who really wants to shoot and has at least a small portfolio reportage shots.
How to do it?
I will not name names of Internet publications. Just because I know that many editors tend not to advertise how to build work in their publications. And if you really want – a simple search on Yandex you easily find a dozen such sites.
To begin write letters to the editors of several similar publications to offer cooperation. Of course, if you attach a letter to the examples of your work is a chance that you will respond immediately increase a lot. Then, most likely, they’ll give you a couple of test “targets” and if you coped with them, then more will have a normal partnership, you are able to “calling” to shoot musicians that you find interesting or editor will occasionally offer you shoot yourself. Accreditation for the concert itself, usually engaged in editor, you’re gonna be just informed when and where to visit and how you recorded in the lists of the press.
Such cooperation has its pluses and minuses.
The main positive point – is that all rights to the photograph remain with you. For publication on the site most often need only “thumbnails” of small size, original photos and all rights remain with you. That means you can sell these photos in a “serious” newspapers and, if lucky, get a good fee. Also the case that particularly great shot of fans want to buy.
The main disadvantage of such cooperation (except for the fact that you do not pay) is that at some concerts do not get accreditation. For example, at the concerts of world-class obscure publications give accreditation is extremely rare.
But in any case, cooperation with the Internet edition is a very good option for a young photographer. In addition to experience shooting pictures in the portfolio, you get a lot of new acquaintances and, over time, the dating will bring you new clients and employers.
How to remove musical performances
Of course, the very subject matter of “how to shoot” is very broad and deserves a separate article. But so far try to tell about the key moment of capture.
Arrangement
One of the most simple and effective compositional techniques with live footage – it is working with diagonals. Ie kopozitsionno when the object is located along the diagonal lines in the frame. When shooting rock concerts this song very often help to build two things:
Guitar fretboard stretching into the upper corner of the frame – a classic concert photography, which will never cease to be relevant.
To the delight of photographers, many singers have been actively moving on stage, giving the opportunity to build an interesting picture.
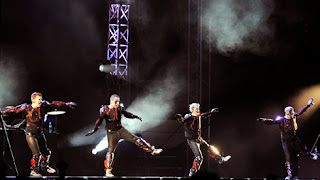
Removing the rock-punk-metal music is very important to convey the dynamics in the frame. You can use this compositional device:
Compositionally musician “coming out” of the frame. And it creates a sense of dynamic action.
But what happens when an artist is not “drive” music? Actions on the scene a little, the actor stands in one position. Then we can try to build the track, not only on the artist, but also placing in the frame stage lighting, as part of the composition:
In some cases, this technique works well:
Frame is built precisely on the artist, it is desirable to see more in the shot there was nothing distracting attention – other musicians or mottled background. While certainly all depends on the particular situation and the actor. For example sometimes in the frame can include an element that stands out from the usual concert merchandise – it may just make the frame more interesting. As in this case with “skull”.
Working with light
It is sad, but it was on the stage of light depends largely on what frame you get. No matter how well you do not “catch the moment” and build the track – a bad stage lighting will ruin it all. If a musician performs at major venues (such as the Olympic), and especially when working with them a good light directors – the problems usually do not happen. But when the band performs in a small club or work light directors is not as such … then a chance of making an interesting photograph is nearing zero. In my memory was a case where the presentation of one group in the club B-2 musicians performed without any stage light. The lighting was just the usual lamps illuminating room … But it is rather an exception, usually it’s not that bad.
The biggest problem of small clubs in that light there is not just weak, but the “monochrome” (I’m not expert in light of the terms, if anyone knows the name of such a light – albeit correct me). It turns out that the whole scene is filled with, for example, faint red light. As a result, make an interesting color or black and white photography is very difficult – picture is boring. There is one trick that may help you “paint” the picture. Try while shooting “dress” to the outbreak of a small plate of translucent color film or plastic, that is, do in fact an ordinary color filter. And then the light from your flash to add color to the dull lighting.
Note on the flash
Many concert photographers do not work with flash. In my opinion this is not correct. The flash is a working tool the photographer. And they should just be able to use. Of course, if the “peel” flash in the forehead with no good will come. But often, the flash can work well as an additional source of fill light. Try to reduce the flash output to step two and send it a bit at an angle to the stage – sometimes a simple trick can make the picture much more interesting.
Try it, experiment and I’m sure you’ll be pleased with the result.
Total points shooting
I think, to talk about shutter speed and aperture settings, a few pointless – you know which settings are suitable in each case, making a couple of test shots. Let me just say a few things:
* Often the concerts there is a choice between the noise and “blur” the image. Here of two evils to choose a smaller – noise. Since them, you can then partially removed during processing, but the blurred picture is much more difficult to fix. Therefore it is always better to put more ISO, rather than increase the shutter speed. Of course you need only raise the ISO if you’re already shooting at a maximum exposure for himself, at which the picture is not blurred.
* If your camera does not always equal to adequately work with the auto white balance, it’s wise to clearly define the mode, for example, «cloudy» – then color all the photographs will be obtained about the same.
* A very useful thing in the concert photos – monopod. A tripod is too cumbersome and highly constrains your actions. Monopod – a light and simultaneously provides good support while shooting. This is especially true when shooting large festivals, where after several hours of continuous operation appears banal physical fatigue. Although the monopod – a thing “for the amateur, there are photos, which is important total freedom camera in hand. At this point everyone chooses for themselves.
* Try to catch the moment when a musician comes close to the edge of the scene and photograph it with a lower angle. This will add “power” musician in the frame, such as in this photo:
How to Handle concert photos
Treatment in concert photography is especially important. At the concert, all photographers are working under the same conditions and the only way to make their work really stands out from hundreds of frames of other photographers – this is an interesting and high-quality treatment.
The main rule – always shoot only in RAW. About the programs for processing RAW files can be read in my article ‘Professional Processing RAW ». Here I will tell you about the main features of the concert is processed.
There are two types of processing concert photos – fiction and reportage. From reportage processing all clear – it is often batch processing, when the important qualitative result when a large amount of training. The essence of treatment is usually reduced to a simple paper with the colors (saturation, white balance), exposure, sharpness and noise. Quite a standard set of simple steps. Write about them here, in my opinion, does not make sense – this is already written not one article.
From an artistic treatment is much more interesting. Its essence is in the artistic presentation of the material when the task – to make a beautiful and interesting picture, but the work is individually on each frame.
Relatively speaking, the entire treatment process can be divided into three main parts:
* Color
* Light
* Details
Working with Color
The main problem when working with flowers – to make them “tasty”. That is, the colors should be harmonious, pleasing to the eye. In concert photography is especially important because very often in concert lighting is ruining all the colors. I’ll try to give you an example:
At this concert spotlights “thrashed” the yellow-orange teries, in fact just killing the color.
Most of the work carried out over the color in Adobe Lightroom, after a little fine-tuning in Photoshop. The main stages of work in Lightroom:
* To partially get rid of the orange-yellow flowers – reduces the color temperature of images, making it colder. Then reduce the color saturation.
* Slightly raise the contrast and brightness. Greatly raise the setting Fill Light – thus lightening the background in the photo.
* Then comes the individual work with the colors: deep red and orange to raise the maximum, and the saturation of yellow on the contrary – reduces to a minimum.
Working with the configuration of Luminance colors: red and yellow lift to maximum lift orange half the red and yellow.
That’s it.
We got the colors that they wanted. Then they can be slightly refined in Photoshop, but the basic process colors, we did it in Lightroom.
Here is another very telling example of working with flowers.
When competent work with flowers “delicious” image can be made from almost any photo, even when shooting conditions were far from ideal.
Sorry to tell in detail about all the ways of working with flowers in this article, the place is not enough … And it’s not about this article … The main advice I can give you – this experiment. Just change the color settings, shadows, saturation in Lightroom, and eventually you learn to do these colors, what you need. But Lightroom is good because it allows relatively simple to carry out such experiments.
Working with light
The biggest scope for working with light and shadow, of course, gives a B / W photo. Simply because when you change the settings of light and shadow, we can not follow the changing colors in the picture. This gives us a big advantage – we can make a strong contrast, individually darken or brighten up any area of the picture. To work with B / W I also encourage you to do basic processing in Lightroom, and Photoshop is individually brighten or darken the image.
But to start experimenting with simple things – such as the contrast B / W images, with proper treatment can get a very interesting result:
It is a detailed treatment of photographers often pay little attention. But through working with the details you can significantly improve picture and make it more interesting. Machining is most conveniently done in Photoshop, here are a few examples of what can be done simply and quickly:
* Try to focus on the eyes. This is a very effective method, and if you took a close-up musician can, for example, just a little lightening eyes and eye area, if it be in the shade. The main thing – do not overdo it. The best treatment – which is not visible, it must be completely harmonious with the whole picture. If done correctly – something simple to work with the Dodge tool immediately focuses the viewer’s attention to the eyes of a musician and will add photos of expression.
* Increase focus. There are two simple techniques that give very good results
o Increase the sharpness of the working Lightness channel color space Lab. This allows you to sharpen with a minimal amount of color noise. A detailed guide how to do it, you can easily find on the Internet.
o Not necessarily add sharpening to the entire picture. To avoid unnecessary “noise” can sharpen only the “key” places the frame – eyes, hands on the fretboard guitar, strings, visible items of clothing. Make it very simple – there is such a tool History brush, you can ask her to “draw” any processing time, which is in your History working on a photograph. What does this leave us? We can apply sharpening to the entire image, specify the History Brush work from this point on History (when we applied a filter sharpening), return to the History ago (that is, when has not yet been applied sharpening) and just paint with a brush on the sharpness of the picture!
* If you increase the sharpness of the most notable places the frame – it will create in the viewer the illusion of sharpness throughout kartinki.Esli you need to remove the noise, do it through a special plug-ins. The most popular of them – Neat Image and Noise Ninja. Quality of their work at times exceed built-in noise removal in Photoshop.
Unfortunately, in this article, I do not have the opportunity to write in detail about the processing of photographs – it would require too much space … Yes, and article received quite a different story. But most important is to understand how important treatment. If you want a really beautiful and interesting concert photography – the ability to handle you need.
Shooting Press Conference
Separately, I want to say a few words about the press conferences. Periodically removing the concerts, you’ll get at the press conference of musicians. Photographers often pay little attention to shooting pressuh, making the usual reportage, photography protocol. In my opinion this is not correct, since it is at the press conference you have the option to make an interesting portrait of the artist. Here are some examples of portraits made by me in press conferences:
The most difficult thing when shooting portraits at the press conference – to make interesting art photography in color. Since lighting pressuhah usually leaves much to be desired and get beautiful color in the photo (which is art photography), it is very difficult.
But successfully filmed a portrait of the artist can be a very high demand. So portrait Grebenshchikova magazine “The Bear” bought on the cover of facilities, and more recently publisher ACT has offered to buy a photo for the cover of Vassiliev his books (at the time of writing, negotiations with publishers).
Therefore, remove, process, and maybe you get a very interesting result. You should not get hung up on “protocol” shooting …
A few words on the downside
Unfortunately in Russia concert photography earn nearly impossible. I’m talking about the stable high income, rather than ad hoc fees. The fact there are lots of reasons, ranging from trace amounts of printed music to the lack of the very music industry itself. So what if you think you earn big money concert photos – most likely you are very disappointed.
But if you just like music, live performances by musicians and you are interested in trying to shoot concerts – then go ahead, most importantly the desire and will succeed.
< Source: www.digitalfreephoto.com >


